This section will guide you step by step through upgrading your computer from Windows 10 to Windows 11.
If you computer is compatible and the update is available for you then you should see an icon down the bottom right corner near the clock as shown below.
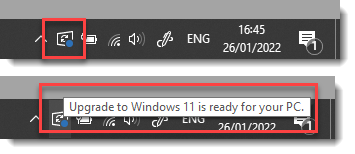
If so then you can double click this icon and proceed to Step 4 of Stage 1 - Installing Windows 11 below.
If you cannot see this icon then firstly try starting from Step 1 of Stage 1 - Installing Windows 11 below to see if the update is available for you, if it isn't then you can try following the instructions in the Installing Windows 11 (Alternative Method) section below.

1)Click Start - located down bottom left hand corner of your screen (unless you have repositioned your Taskbar to the top or side of your screen)
2)Click Settings - the icon that looks like a cog located down the left hand side of your start menu.
3)Click Update & Security.
4)If your computer is compatible and the Windows 11 upgrade is ready for you then you will see a screen similar to below, click Download and install to start the upgrade process.
If the Windows 11 update is not showing here then you can try method 2 below.
N.B. If you want to stay on Windows 10 and NOT upgrade to Windows 11 then this is the point where you would click Stay on Windows 10 for now instead.

5)Click Accept and install.

6)Windows 11 will then start downloading and you will see the current progress shown as below (this can take some time on slower internet connections).

7)Once it has finished downloading it will move on to the installing stage and again progress will be shown as below.

8)Once it has finished installing you can then click Restart now to complete the update process.

9)Your computer will then restart and complete the update process, you will firstly see a blue screen and then a black screen as below showing you the progress, the computer may restart several times during this process.

10) Once the update process is complete you will see the Windows lock screen which shows a wallpaper image, press a key or move the mouse and you will then see the log on screen where you can enter your password / PIN (if you have one) or click on your user account to log in to Windows 11 for the first time.
 
11) The first time you log in you will see a series of messages as below flash across the screen whilst it configures your user account for the first time.
N.B. If after you log on for the first time you see a series of screens asking about language, keyboard, networking, location and other questions about using your computer then these are covered here.

12) Windows 11 is now installed - proceed to Stage 2 - Initial Tweaks below.
|


1)Click the link below to open the Windows 11 Download website.
https://www.microsoft.com/software-download/windows11
2)Click Download Now under the section titled Windows 11 Installation Assistant (as shown below)

3)Depending on which browser you are using the download will appear as below - click on the downloaded file to proceed.
Microsoft Edge - it will appear in the top right corner.

Google Chrome - it will appear down the bottom left corner.
4)Click Yes on the security prompt which appears.

5)The Windows 11 Installation Assistant will then be launched, click Accept and install to continue.

6)It will then go through three steps - Downloading, Verifying download and Installing - depending on the speed of your internet connection and computer this may take some time.

7)Once it completes the Installing stage it will automatically restart your computer after 30 minutes or you can click Restart now.

8)Your computer will then restart and complete the update process, you will firstly see a blue screen and then a black screen as below showing you the progress, the computer may restart several times during this process.
9)Once the update process is complete you will see the Windows lock screen which shows a wallpaper image, press a key or move the mouse and you will then see the log on screen where you can enter your password / PIN (if you have one) or click on your user account to log in to Windows 11 for the first time.
10) The first time you log in you will see a series of messages as below flash across the screen whilst it configures your user account for the first time.
N.B. If after you log on for the first time you see a series of screens asking about language, keyboard, networking, location and other questions about using your computer then these are covered here.
11) Windows 11 is now installed - proceed to Stage 2 - Initial Tweaks below.
|

The first thing you will notice when using Windows 11 for the first time is that the Start Menu contains lots of preinstalled apps (bloatware) that you may not want, and that all the apps you previously used in Windows 10 may not appear.
Uninstalling unwanted apps
Right mouse click on the app icon, choose Uninstall from the menu which appears and then click Uninstall in the prompt which is displayed - as shown below.
Removing (unpinning) apps you don't want from the Start Menu
Right mouse click on the app icon, choose Unpin from Start from the menu which appears. This removes the icon from the start menu but doesn't uninstall it, the app is still available by clicking All apps in the top corner of the start menu or by searching.
Adding (pinning) your preferred apps to the Start Menu
Click All apps in the top corner of the start menu, find the app in the list, right mouse click on it and choose Pin to Start from the menu which appears.

TIP: You can also choose More > Pin to taskbar if you wish to pin the app to the taskbar at the bottom of your screen.
- OR -
You can type the name of the app in the search box at the top of the start menu and then choose Pin to Start (or Pin to taskbar) in the right hand column (as shown below)

|


If you decide you don't like Windows 11 then you can rollback to Windows 10 but you only have 10 days to make this decision! after that point the only way to go back to Windows 10 would be a complete wipe and reinstall of everything on your computer.
1)Right mouse click on the start menu button and choose Settings from the menu which appears.

2)Click Windows Update down the left hand side.
3)Click Advanced Options.

4)Scroll down and click Recovery.

5)Click Go back.

6)Choose the reason you wish to go back and click Next.

7)Click No thanks.

8)Click Next.

9)Click Next.

10) Click Go back to Windows 10.

11) The computer will then restart and being restoring your computer back to Windows 10.

12) Once done your computer will restart one final time and you will be back to your Windows 10 log on screen.
|
